Wednesday, April 28, 2010

A Spring Flower Wreath...

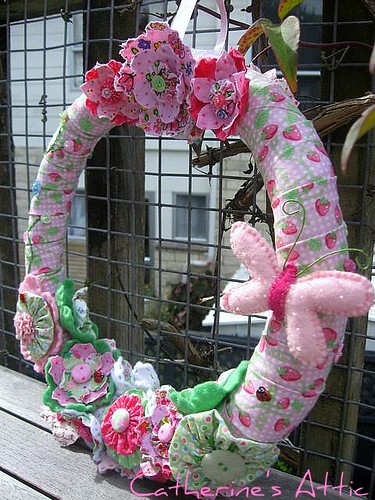
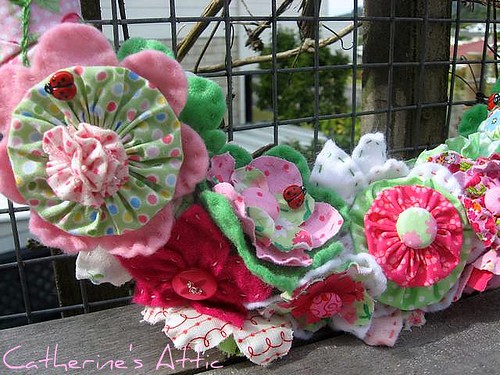
Although it is definitely Autumn here this wreath reminds me of spring. I decided a couple of months ago to make Amelia a wreath to hang in her bedroom but had originally thought of just covering it with yoyo's which if I'd stuck to that idea it would have been finished a lot quicker. Somehow along the way I decided that fabric flowers would make a pretty feminine wreath and it evolved from there. 

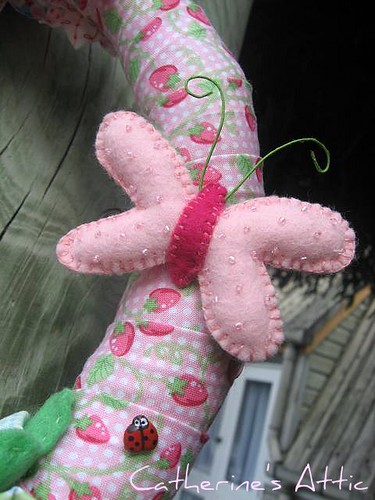
I added a felt butterfly studded with pink beads.

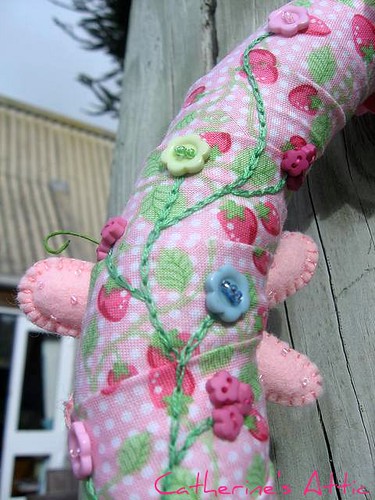
I love using  buttons on small projects and have acquired quite a collection now. Before I throw out clothes I always take the buttons off to reuse and save those extra buttons you get with some clothes. 

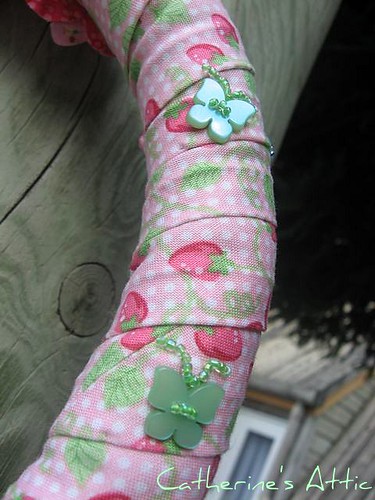
These little butterfly buttons were bought on a whim a while back. I have jazzed them up by adding some beaded antennae.

The ladybugs are buttons that were originally on a jumper Amelia and then Caitlin had when they were babies.

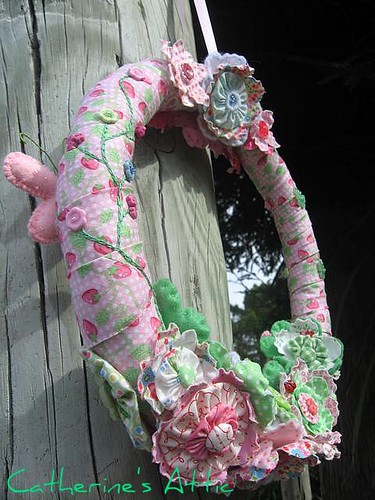
I made this wreath using a plain cane wreath bought from Spotlight and covered it by wrapping around some leftover batting then some bias binding. This provides a bit of bulk and a nice soft base to sew embellishments onto.

I ended up making more flowers than I needed. I think I used about 25 small and large flowers. I have some other ideas for the flowers I have left which I will share with you soon so watch this space.
I'm adding this to Amylouwho's sew'n'tell this week so click on the button and check out all the other finishs for this week!

Tuesday, April 27, 2010

Fabric flower tutorial!

This is a hopefully simple tutorial on how I make my fabric flowers. I do quite a few variations but we'll start with a basic one.

You will need :
  • Small fabric scraps for 2 flower shapes
  • Paper for making flower pattern
  • Steam-a-seam or similar product
  • Small scrap of felt
  • Small fabric scrap for yo-yo
  • Coordinating thread
  • Needle and small scissors
  • Button

Draw and cut out to paper patterns of 2 different sized flowers. Fuse your fabrics together ( 2 layers of the same fabric wrong sides together) using the steam-a-seam. Pin pattern onto fused fabric and cut out.
Thread your needle with coordinating thread and tie knot at one end. Starting at the centre of the flower push your needle in between the 2 layers to 1/8 of an inch from the outside of the flower.

Using a running stitch sew all round the edge pulling the thread and shaping the petals with your thumb and finger as you go. When you've sewn all the way around push the needle back between the two fabrics and secure the thread ends together.Once all the layers are sewn together you will not see these thread ends.  Repeat these steps with remaining flower.

Cut out a small circle of felt. Make small wedge shaped cuts all around the edge by folding in half and cutting tiny triangles at each end of fold. Continue folding and cutting until there are even wedges cut out all the way around ( about 8 wedges).

For the yo-yo cut a small circle of fabric. I used a cardboard pattern from a covered button making kit.

Sew a running stitch all the way around folding a scant 1/8 inch as you go. The bigger you stitches, the smaller you centre will be.
Pull thread to gather up into a little pouch shape, flatten out into yo-yo and secure your thread ends.

You should now have four layers to make up your flower. Place together from biggest to smallest ending with the yo-yo. I secure the layers together making sure they are centred then sew the button on top sewing through all layers. Congratulations you now have one flower to use to embellish a bag or make into a brooch and pin to a plain top. You can make this flower your own by adding beads or use felt for one of the flower shaped layers. I also like to sometimes use a covered button for the centre. Play around with different flower shapes too. You can see some of my flowers here
I had intended to show what I have been making with all these flowers but it was an over cast day and my photos weren't quite up to scratch. 

Monday, April 26, 2010

Autumn pickings......

We have been enjoying some beautiful clear autumn days for weeks now and this last weekend was no exception. On Sunday I took the girls out to the orchard which is a 10 to 15 minute drive north of  Whangamata to pick some autumn fruits. Even though they had a little moan about it they had a lot of fun climbing the ladder provided and picking the biggest and then the smallest apples they could find.

The trees were laden and the fallen apples left a lovely autumn coloured carpet underneath.

We picked braeburns for eating and......

......grannysmiths for cooking although these are Amelia's favourite eating apples.

An abandoned birds nest from last spring.

After picking 2 big bag fulls of apples we headed on over to the Feijoa trees. These are our favourite autumn fruits and our orchard has some really big juicy ones. When we tire from eating them I make Feijoa muffins and Feijoa cake.

We also filled the biscuit tins. The girls baked something each and even managed to bake in the kitchen at the same time without fighting. Amelia helped Caitlin out when she needed it but didn't interfere when she was wanting to be independent and do things herself. I was very impressed with their maturity and managed to put a dent in my ironing pile while they were busy. Caitlin made Anzac biscuits  (this is a great, easy recipe perfect for beginner cooks!) because Sunday was also Anzac day and Amelia made a lemon and almond slice. I made the double chocolate biscuits in the foreground of the above photo.

Tuesday, April 20, 2010

A lovely mail day!

I recieved my Easter/May swap parcel this morning! It was a lovely surprise waiting for me when I got home from a bike ride. Inside was some gorgeous Heather Ross Mendocino fabrics (7 pieces) and a cute birdie fabric, matching thread, a needlecase - perfect for my handquilting needles, a note book, a mini calender and last but definitely not least a yummy selection of chocolates.
Thank you to my secret swap partner Laurie (ladmquilter). Everything is just perfect!!

Saturday, April 17, 2010

8 down 12 to go...

Nearly halfway there with my 'quilt as you go' blocks. I need to do 2 more like these ones with the pale centres then the other 10 blocks will be opposite with dark centres. I'm really liking these blocks now that I have made a few more. They do take a bit longer, actually quite a bit longer than a normal block but I won't have a huge quilt to quilt at the end. I'm just hoping I have enough scraps left to complete it otherwise I will just have to cut into fabrics in my stash which is probably a good thing because then I'll have room for some 'new' fabrics. You can check out all the other 'quilt as you go quilts' over here.

Saturday, April 10, 2010

Random snapshots around our home....

Addicted to this........

Getting back into this.....


Still working on these.....


Inspired by autumn flowers in our garden.........


Flowers from my red onion plants at 3 different stages of bloom.

 
Looking forward to lots of sewing in the next 3 days as the girls have gone to Grandma and Grandad's to be spoilt rotten. Happy Birthday Grandma!!

Wednesday, April 7, 2010

Today's craft activity....

Book marked this site a while back thinking that we  might try some the cool activities on it some day. All the activities are free to download and are fairly quick and simple. Quite a few of the activities would be suitable for younger children too.Today we made 'spinners' which are made of paper with a different part of a picture on each side with string in the middle. Hard to explain but when you spin the string the two bits of pictures mix together to make one cool picture.  Hopefully my photos will demonstrate better than I can explain.


When you spin this one you get the face on the cat.
Here are the 6 spinners we made and ...

....the other 'half' of the pictures.

I have managed to get a little sewing done today. These blocks are for Penny's "Quilt as you go quilt-along". I started off with the random placed coloured one on the right but really wasn't liking it so decided to go with the one colour per block which works better for me.

Tuesday, April 6, 2010

It's the holidays....

 
Yes the girls are off school for 2 weeks so to keep them entertained I will try and find some sort of craft activity each day. Today we made these bookmarks based on the latest Alice in Wonderland movie just released. We downloaded them from Disney's website where they have various crafts and even recipes based around the film. Amelia and I are keen to make the 'Alice shadowbox' next which  little bit more involved than the bookmarks. For the bookmarks we just printed them on normal printer paper and glued them on to cardstock then added different coloured ribbon to the tops of each one. Bookmarks always come in handy in our house!
If you have any great craft ideas so share I would love to hear from you.

Sunday, April 4, 2010

Wishing everyone a Happy Easter!!!!!

Whipped up these fabric Easter eggs yesterday afternoon. I found the tutorial on Retromama's blog last year and have been wanting to make them ever since.They were really quick and easy plus you can just use up some fabric scraps. I've matched some of my stripes from the cushion in my last post with other scraps including some vintage fabrics given to me by my Aunt who was a bit of a seamstress in her day. My favourite fabric and very appropriate for Easter is the yellow one in the front with the chickens on it.

Hope everyone is having a great Easter weekend where ever you are!!

Friday, April 2, 2010

A Friday finish!

Another cushion to lounge around on. Have been working on this all afternoon and managed to get it finished just before dinner (thankfully my DH made dinner tonight). After I machine quilted it I wasn't so sure whether I still liked it as much but now it has a nice plump pillowform inside I'm warming to it again. I did really enjoy working with the stripes for a change and just playing with the layout. I think in hindsight I would have done a simpler quilting pattern. The idea for this cushion is from Kaffe Fassetts book "Passionate patchwork" which is full of beautiful quilt patterns and just great inspiration.

The reverse side.

 It measures 24" x 24" so its big enough for a throw cushion in our lounge. I really want to keep it nice and vibrant which will be a challenge in our lounge as we have floor to ceiling windows on one wall and the sun streams in all morning (nice on winter mornings though).

I'm adding this to Amylouwho's Sew'n'tell Friday this week. Be sure to go on over and check out everyone's great finishes this week.
Related Posts Plugin for WordPress, Blogger...