Showing posts with label sewing box. Show all posts

Saturday, September 10, 2011

The Sewing Attic - a little tour...

 I've just had a bit of a tidy up and re-arrange in my 'sewing attic' mainly due to finally putting my old sewing machine into semi-retirement and replacing it with my new to me Janome. I had come home early from a school Cross country trip with Caitlin and had an hour or so to spare and thought I would spend it wisely swapping my machines around but ending up having quite a tidy/clean-up. You know how once you get started tidying up one area it sort of leads on to another area and before you know it 2 hours has gone by. Anyway it also occurred to methat this would be a good time to take photo's to share on my blog. I always find it fascinating having a peek into the studios/creative spaces/sewing rooms of fellow crafters so I hope you enjoy this little tour!

Here is my new machine surrounded by my favourite things ie; favourite hand cream, pretty box of tissues (at the back), mini red drawers filled with machine needles etc.. Above and to the right-hand side is a wire recipe holder that my Grandmother made and which I now use for holding pattern instructions.
My sewing space is on the top floor of our home which is an 'A' frame house therefore making the top floor like an attic space with its sloping walls. The downside of it is that it is not as big as I would ultimately like and the lighting is not so great but I love having a space that's totally dedicated to what I love to do. Also when I'm sitting at my machine I can look over the railing and down into our lounge or out our big lounge windows. The view from these windows looks out over Whangamata and out to the ocean beyond plus I can be nosey and see who's driving up our street or my girls walking home from school. And because it's on the same floor as Caitlin's and what used to be Amelia's rooms I've never felt shut away from what the rest of the family is doing. I am also proud to say that my machine still sits on a sewing desk/table that I made years ago when I bought my first machine. It has 2 large cubby holes or shelves on each side that store books, magazines, scissors and all those things that need to be handy.
 Behind my sewing machine I have a set of wire shelves holding patterns and other various sewing/crafting needs. On an old trunk sits my wooden sewing box and a few baskets filled with my latest fabric purchases. Having some fabric especially newer fabric on display keeps me inspired :)
The bigger baskets hold larger pieces of different types of fabric and the red vintage vanity case has small scraps of girly fabrics that I can't quite throw away.
To the left of my sewing machine is a wooden box full spools of thread with an old fashioned styled lady pincushion sitting on top that my Mum made years ago. Under the cover is my Janome overlocker bought from my dressmaker neighbour. This part of my sewing table also serves as a small ironing/pressing space which is why I have an old towel on it.

 At the end of the sewing table is a collection of some of my quilts and items either finished and waiting for new owners or works in progress. At the moment that would be 3 quilt tops!
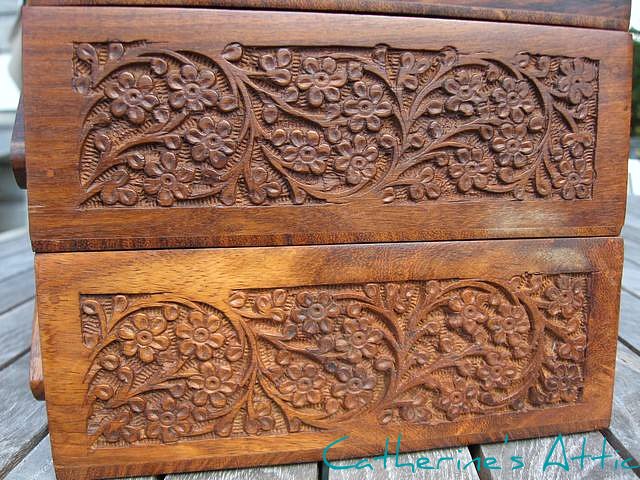
Underneath that happy pile of quilts and things is this lovely trunk that came (along with the other trunk in a previous photo) across from Ireland with my Great Grandparents. 
And ah yes this where I store the rest of my fabric stash. While it's not immediately accessible due to having to haul all those quilts and things off to get inside it, it is a nice safe way to store fabric.
And just around the corner on the other side of the trunk is this little display of cushions and Caitlin's Zig-zag quilt. And of course in that picnic basket is more fabric....my collection of Batik fabrics.
 So technically we are out of my sewing area now but I thought I'd share this photo of vintage suitcases. The bottom 2 were rescued from my parents garage and I can remember them being used on holidays when I was young along with that red vintage vanity case. The smaller blue one is an old school suitcase that I used at primary school and the top one was my kindergarten case which I think my brothers used before me.
This space is to the left of my sewing space and is a little mini library/reading area for the girls. It's a lovely place to sit and do some hand sewing or to just read of course because it gets the afternoon sun which is especially nice on a cool winters day. Out the window the view (beyond the neighbours house) looks towards the bush clad hills that surround our town. This space is also a favourite place for our feline friends to snooze in as well. The little red chairs used to be the girls when they were smaller but now make great cat beds. 

Congratulations if you made it to the end of this rather long post! 
I really hope you enjoyed seeing where I create! As I said at the beginning I love looking at other peoples creative spaces so if you would like to share your creative space on your blog let me know(in the comments) and perhaps I can compile a list here on my blog for us all to look at :)

Have a great weekend!!


Friday, December 3, 2010

Shop update....

Newly listed in my shop are kits with instructions to make your very own heirloom sewing box. I know it's taken a very long time for me to get around to doing these kits but this was a bit of learning curve for me and I wanted to be sure  my instructions were easy to follow and full of good detailed photos of each step for those of you that need visuals as well as written instructions. Making your own sewing box up means you can choose specific fabrics of your choice and you also get sense of accomplishment at the end of having done it yourself. These boxes are fairly easy to make but do take a bit of time and patience. Of course I do have a couple made up and ready for instant purchase if you're time poor.

My creative space this week. Yes due to a custom order of a flower brooch I did manage to squeeze in some relaxing hand sewing creativity.

I'm loving the colour combo of this brooch and might have to replicate in other projects some time. Hope the recipient likes it!
Have just listed 3 different styles of these brooches in my shop.

Sunday, July 4, 2010

A "modern" Victorian sewing box.


I first made a Victorian sewing box a few years ago, before kids and when I was living in Auckland. My LQS was "Patchworks of Ponsonby" which is no longer there now, used to hold lots of various sewing classes and one I took was to make this box. You can see my orignal box here. I do remember it taking a while to finish but obviously my memory has faded because this time it took a couple of weeks. Even my husband commented on how long it was taking me! To be fair on myself, when I did it in the class we were given kits to work with so this time I had to start from scratch and make the kit myself, work out all the correct measurements and how it all went together. Now that it's all finished  I'm pretty happy with the result. I'm sure next time I make one it will be much quicker.


I used 3 different fabrics, the exterior fabric is an Anna Griffin fabric as is the paler green butterfly print used in the interior. I love the striped fabric (I like stripes in general actually!) which is one I bought in the States a couple of years ago and I'm not sure who makes it. The pockets and gussets are machine sewn but the rest is all sewn together by hand with quilting thread and a little glue to hold it in place while I sewed.


What's great about this box is that it opens right out so you can see and find everything inside. It has 3 pockets, and the other sides have extra padding for holding pins and one with some felt for holding needles.


One last photo to show you the beading detail I did on the lid.
I am going to be putting this in my etsy shop which will hopefully be up and running very soon. Just waiting on my way to busy husband to find some time to help me out a little :)

Wednesday, March 17, 2010

A bargain to treasure...

Yesterday Mum and I went to Hamilton to pick my Dad up from hospital. As he was not going to be ready till after lunch we took the opportunity to do some shopping.
Mum need to go to the "Trade Aid store " to purchase some of their 'fair trade' drinking chocolate which is Dad's favourite. Trade Aid is a shop that sources handcrafted goods from mostly third world countries and is run by volunteers. They sell all sorts of things from fairtrade foods to rugs , jewellery, baskets plus traditional childrens toys etc...and everything is beautifully crafted. We spied this beautiful wooden sewing box high up on on shelf. The shop assistant lifted it down so we could check it out properly but as it was priced at $100 it was above my budget and my birthday isn't till October. So we purchased what we had come in for and then as we were walking out I saw another box exactly like the other one but heavily reduced down to $40 due to a damaged hinge on one of the lids. I couldn't believe my luck and didn't think twice about buying it! I love it!

I'm not sure which country it was made in or the wood used but it has a beautiful grain. I actually have a sewing box like this except it is bigger and nowhere near as beautiful as this one. I can remember my Grandmother having a box similar to this one and although I was left her treadle sewing machine (blogged about here) I somehow never recieved her sewing box. This sort of makes up for it but it would have been interesting to see what she kept in it.

The beautifully carved ends of the box!


Tuesday, January 5, 2010

Making flowers...........


I spent a couple of hours yesterday making some "origami fabric flowers". I first saw these flowers on Sandy's blog Peek-a-boo. She then generously shared a very easy to follow tutorial for them a couple of months ago.

This is one of my sewing boxes which I made quite a few years ago. It originaly had a folded ribbon flower on it's lid that had begun to unravel. Now it looks pretty again with its brand new flower on top of the lid.

This flower adorns my latest bag and was made using 1" squares. I thought it would be quite fiddly to make but it went together as quickly and as easily as the bigger one.

I made this bag over the weekend from a pattern I found on Artsy-craftsy babe's blog. She has a few free tutorials and this bag is one of them. Its called the "Phoebe bag" and I downloaded it and printed it out quite a while ago then forgot I had it till I gave my sewing space a clean out. I found quite a few patterns I have printed out and still want to make, so watch this space.

I used Heather Bailey's "Swirlybuds" in fuchsia for the outside of the bag, the striped lining and pink and white polka dot used for the pocket are from Spotlight. I used a magnet closure for the first time too which was again pretty easy although I did have to ask my husband to help push the metal tabs down.
So there you go 2 great tutorials that I can thoroughly recommend.

Related Posts Plugin for WordPress, Blogger...