Saturday, October 29, 2011

Bliss pinwheels!

Bliss pinwheel quilt
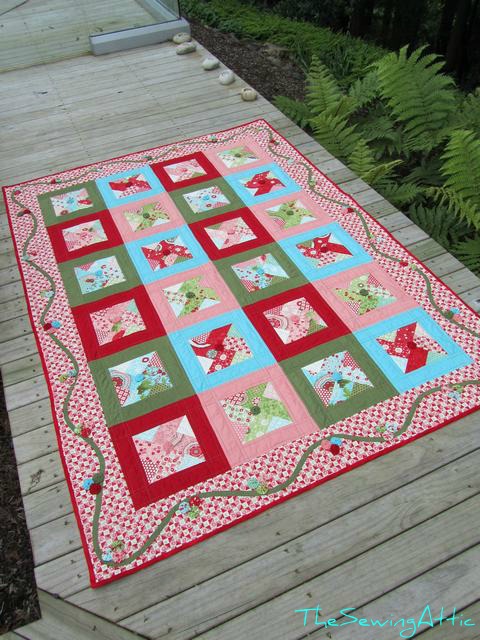
I finished hand sewing the binding on this quilt yesterday afternoon and took it outside for a quick photo shoot just in time to enter it in the Bloggers Quilt Festival hosted by Amy. For those of you who are regular readers you will know all about this quilt but for those who are are visiting from the  Bloggers Quilt Festival I will give you a run-down on its statistics :-) Oh and welcome if you are new here! You welcome to hang around and have a look at what I get up to.
Bliss pinwheel quilt
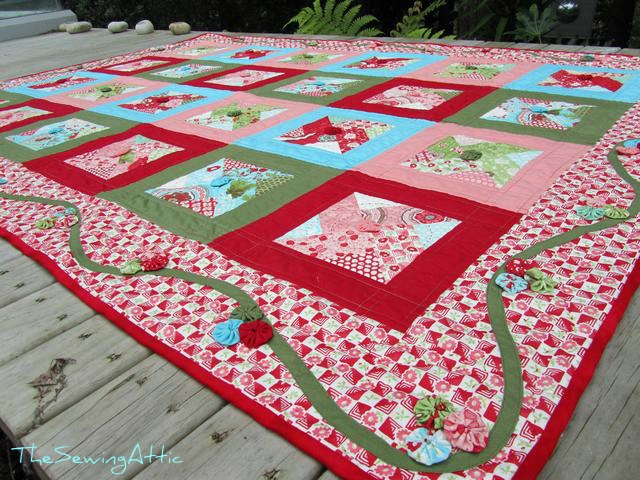
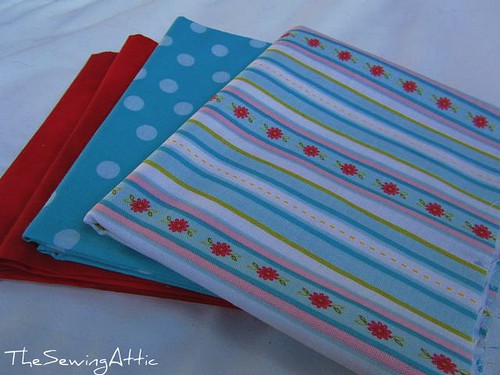
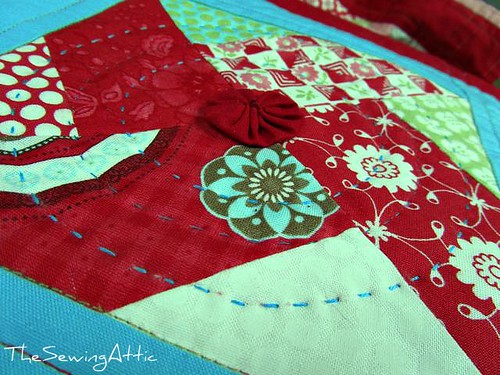
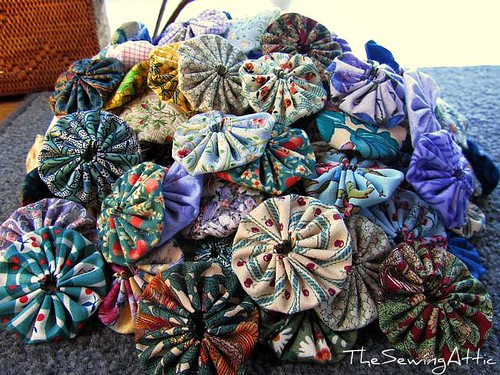
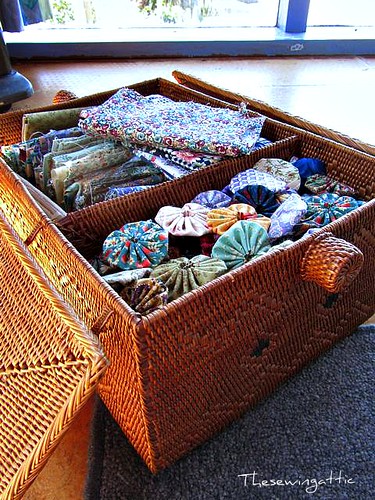
So this quilt was started with a jellyroll of that pretty fabric collection called "Bliss by Bonnie and Camille". The framed 6 inch pinwheel blocks were originally going to be sewn together to make 12 inch blocks but I decided that they looked better framed individually with the coordinating solids. I also added yoyo flowers to each pinwheel.

Bliss pinwheel quilt
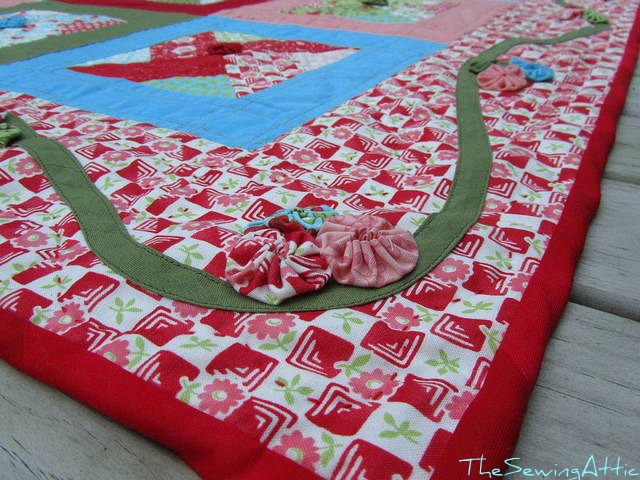
I then added a wide border in one of the pretty red prints then machine appliqued a meandering vine with clusters of yoyo blossoms. 
Once I finished the top I was a little stuck on how I should quilt it. I love the look of hand quilting but also like simple straight line machine quilting so I did a bit of each. Another problem that stopped the progression of this quilt was trying to find the right shades of Pearl cotton to hand quilt it in but I finally found the right colours after a lot of searching every time I went out of town. (I live in a small coastal town 2 hours drive from any city with a decent amount of shops.) 

Bliss pinwheel quilt

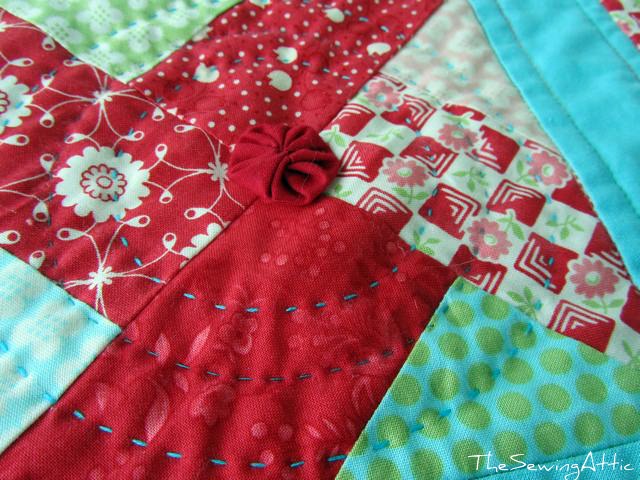
The pinwheels are hand quilted with circles of Pearle thread and quilting cotton to give the idea of a spinning pinwheel. 

Bliss pinwheel quilt
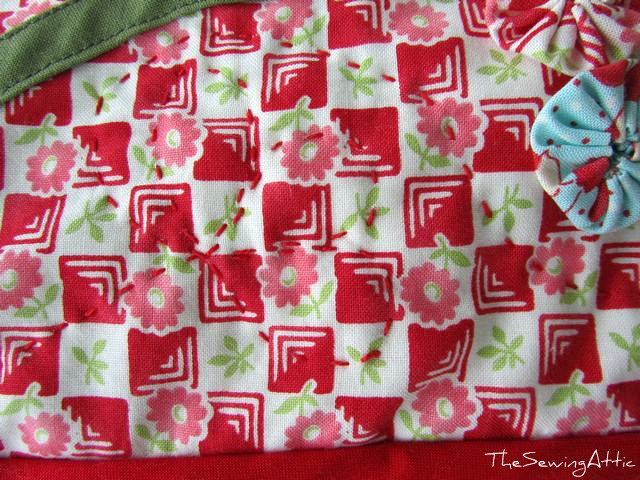
The border is hand quilted using the Pearl thread in a meandering line with little loopy flowers to echo the clusters of yoyo blossoms.

Bliss pinwheel quilt
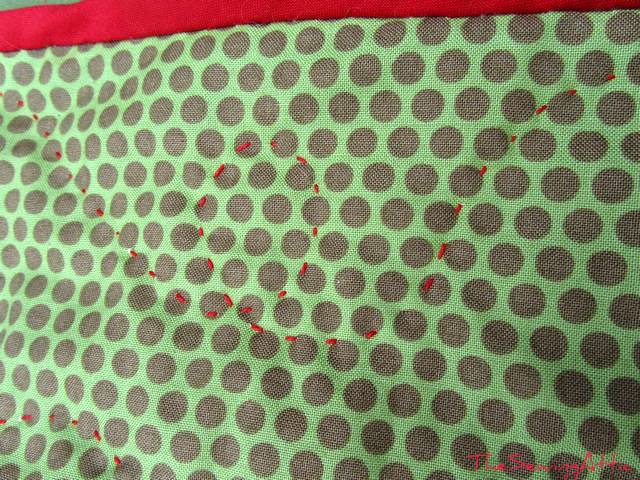
Here's a photo of the back to give you a better idea of the border quilting.

Bliss pinwheel quilt
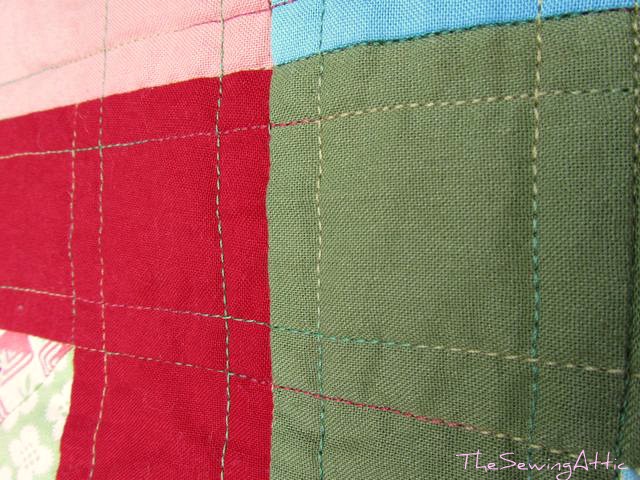
For the straight line quilting I used a variegated thread in shades similar to the fabrics.

Bliss pinwheel quilt
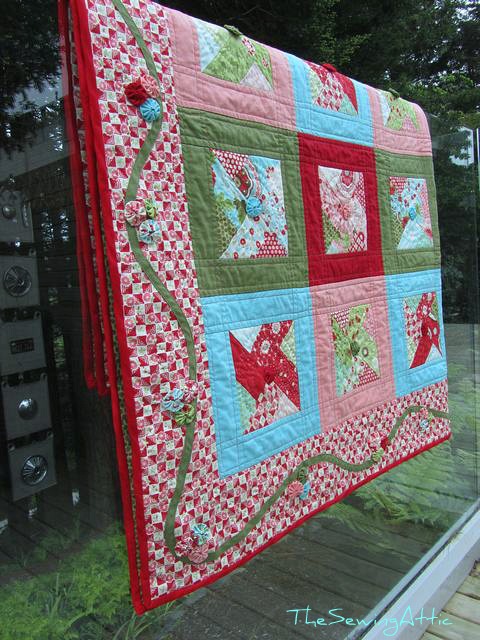
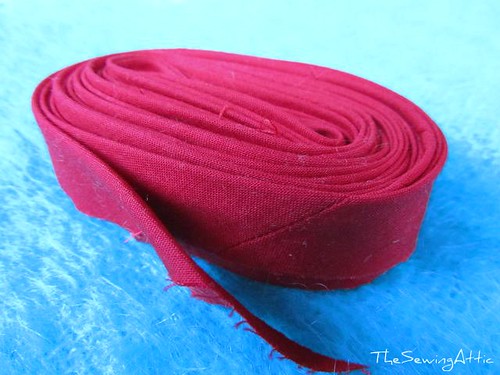
I used a solid red to bind it which I think frames it all nicely. I always use a double thickness of binding for better durability.

Bliss pinwheel quilt
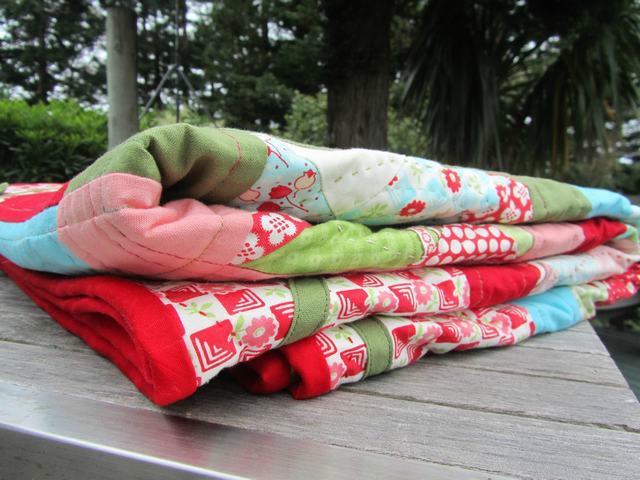
This quilt, which measures 50"x70", is special to me because it's the first quilt I've made specifically to sell in my shop and also it's the first quilt I've made using just one fabric collection. I love how it turned out and would be quite happy to keep it if it doesn't sell. When I made the initial pinwheel blocks I ended up with too many so have made another quilt top (crib size and waiting to be quilted) plus a bolster pillow to match the quilt. 
I do hope you enjoyed reading about the makings of this quilt and thanks to Amy for hosting this fun Bloggers Quilt Festival. I'm off to check everyone elses entries now!


Friday, October 28, 2011

A winner and some recipes to share...


To everyone who entered my giveaway thanks so much for the birthday wishes and for sharing your favourite birthday memories. I really enjoyed reading each and every one! I just wish I could send out 6 parcels instead of the one so I'll have to have another giveaway sooner rather than later. So on to the winner. The Random Generator picked:

Number 18 Heather A from Canada! Congratulations Heather! I'll be in touch via email soon!

And now here's a couple of recipe's to share with you....

I quite often do a little baking in the late afternoon just before I get dinner on to make the most of heating up the oven. Yesterday afternoon after I whipped up a batch of muesli for my breakfast I made this Chocolate Banana bread from Julie Le Clerc's book "Cafe @ home". I have many recipe books but this book is one I cook from often. The recipe's are modern and fresh and use ingredients that I usually have in the pantry. Plus it has a pretty mint green elastic band to use as a page marker! This is the second time I have made this loaf and we like it so much I thought it would be nice to share. It is actually under the section 'Breakfast in bed' ! Now if you are like me and don't like the taste of banana cake I can assure you, you will like this as the banana taste is not there but makes this loaf nice and moist. So on to the recipe:

You will need:
  • 150g butter
  • 3/4 cup caster sugar
  • 2 eggs
  • 2 tablespoons milk
  • 2 ripe bananas, mashed
  • 1 cup self-raising flour
  • 1 teaspoon bicarbonate of soda (baking soda)
  • 1/4 cup cocoa powder ( the best quality you can afford :-)
  • 1/2 cup Chocolate chips
  1. Preheat oven to 180 C on fan-bake. Grease and flour a loaf tin.
  2. With an electric mixer, cream butter and sugar together until pale. Beat in eggs then milk and bananas.
  3. Stir in sifted dry ingredients to combine. Lastly, stir in chocolate chips. Spoon mixture into loaf tin and bake for 45 minutes or until a skewer inserted comes out clean. Turn out onto a wire rack to cool. Slice to serve.
  4. Loaf will last 3-4 days if stored in an airtight container.
Also I thought I'd share the recipe for Belgium biscuits (from the previous post) for those who are unable (and had never heard of) to get the Edmonds cook book. Belgium biscuits are quite an old recipe and a classic biscuit recipe here in New Zealand and maybe in Australia. A lovely elderly lady who until recently used to live across the road from us used to make them regularly. She was one of those very generous people who was always giving us and other neighbours things such as baking as a thank-you for helping her out and was famous in our street for her apple shortcake, sponges, chocolate fudge and other baking. I would often send the girls over to return a plate to her and they would always come back with some home-made biscuits, fudge or lollies. Sadly for us she has recently moved to a home closer to her family.
So here is the recipe for Belgium biscuits:

You will need:
125 grams butter, softened
  • 1/4 cup brown sugar
  • 1egg
  • 2 cups flour
  • 1 teaspoon baking powder
  • 1 teaspoon cinnamon
  • 1 teaspoon ground ginger
  • 1 teaspoon mixed spice
  • 1 teaspoon cocoa
  • 1/2 cup raspberry jam approximately
  1. Cream butter and sugar until light and fluffy. Add egg and beat well.
  2. Sift flour, baking powder, spices and cocoa together and mix into creamed mixture to make afirm dough.
  3. On a lightly floured board roll dough out to 3mm thickness. Cut out rounds using a 6.5 cutter. Arrange on a greased oven tray and bake at 180 C for 15 minutes or until golden. 
  4. When cold ice half the biscuits. Spread the un-iced biscuits with raspberry jam and place iced biscuits on top. Makes 18.
For Pink Icing:
  • 3/4 to 1 cup icing sugar
  • 1/4 teaspoon rasberry essence
  • few drops of red food colouring
  • water
Mix icing sugar with essence and colouring. Add sufficient water to make a pink spreadable icing.

Enjoy!!!!

Gussy Sews Inspiration Workshop!

Wednesday, October 26, 2011

Getting inspired by the colour 'Pink'...

 Pretty in pink Belgium biscuits, from my much used Edmonds cook book.

 These cerise little flowers are blooming in my front rockery garden.
 One of our many Rhododendrons first to flower this season.
 Some clematis flowers gracing the stairs up to our deck.
 Another brighter pink Rhododendron that says look at me. 
Last but not least a little pink Dianthus/Sweet William flower.

Hope you were inspired!

Tuesday, October 25, 2011

A celebration of All things Black!

An etsy treasury I curated in honour of the All Blacks winning the Rugby World Cup on Sunday night! Enjoy!

Monday, October 24, 2011

Baby boy sewing....

Just for kicks ball and baby boy shoes
My niece has just had her second little boy and although I knew of his impending arrival quite a few months ago now I waited till the very last minute to make up some welcome gifts for him. I've made the 'Just for kicks ball' from Anna Maria Horner's book "Seams to me" once before but I think this is such a fun toy to make I whipped another one up over the weekend. I went through all my fabrics and chose 32 different fun  prints so it's sort of like a mini 'I spy' quilt as well as a toy. Fun to make up but challenging to get all those corners perfect and there's a lot of them! 
Baby boy shoes
These cute little shoes are from Anna's second book "Handmade Beginnings" and were just lovely to sew up. The 'inner sole is meant to be adhered to the shoe with double sided iron-on interfacing but I hand sewed around them to give a neater and stronger finish. It was quite a good challenge for me to make boy items since I have 2 girls and therefore lots of girly pretty fabrics. I was also thankful for having some hand sewing to complete while the Rugby World Cup final was on as it was such a tight game I couldn't bare to watch much of it and just concentrated on my sewing and listened. Thank goodness we won!!
I'm hoping to have a boy themed baby quilt to show later in the week.
Hoping everyone enjoyed a sunny Labour weekend as we did!

Friday, October 21, 2011

Birthday giveaway!!

Birthday giveaway goodies
So when I said I'd have a giveaway later in the week I didn't quite mean this much later but hey it's the school holidays so the girls have been keeping me busy. 
This giveaway is my way of thanking everyone who visits my blog regularly and for those who leave me sweet encouraging comments as well. I hope you like this little sewing related package of goodies I have put together for you. Included are, a charm pack of  the Freebird by Momo fabrics, 3 skeins of pearl thread for hand quilting in coordinating colours, a reel of Gutermann sewing thread, pretty pastel quilting pins, a pack of assorted needles and lastly a pincushion made by me from a free pattern by Heather Bailey.
If this sounds like something you'd like to win all you have to do to enter is leave me a comment telling me your most memorable birthday or birthday gift. The good thing about having a birthday in October is the weather is usually nice and sunny and it's also scallop season!
I'm going to leave this giveaway open till next Thursday so everyone has plenty of time to enter and 
overseas entries are most welcome!! 

Saturday, October 15, 2011

Pearl threads...

Anna Maria Horner perle cottons
I ordered these beautiful collections of Pearl cottons by Anna Maria Horner what seems like a long time ago now but just received them yesterday. To save on postage I sent them to some friends in the US and my husband bought them home in a car that was being shipped back to NZ. The car arrived about 3 weeks ago but they were then locked in the boot of the car which was and still is in Auckland getting work done on it but this week my husband kindly got them out for me and bought them home!

Anna Maria Horner perle cottons
The colours are divine and are a very welcome addition to my stash as getting the right colours in these cottons is really hard where I live and I very much like the look of these threads with hand quilting. I already have a project in mind to use them on!

Continuous bias binding
Yesterday I made this roll of bias binding for this quilt but was really frustrated to find I was about 40 inches short and could not find anything else suitable in my stash that seemed to look as good as this lovely vibrant red. So I just had to plan a trip today to Waihi where my nearest quilt shop is. 

New additions
As you can see not only did I find some more solid red fabric but some lovely aqua spots and this sweet little daisy stripe. I'm a bit of a sucker for stripes and polka dots so I just couldn't resist these 2. In case you're interested they come from the Riley Blake collection "Sweet Divinity" by "The quilted fish". It really is nice to shop in an actual brick and mortar shop and see fabrics in person rather than online but I wish they weren't so ridiculously expensive here. 
I also bought some other fabric that just might be put aside for a little birthday giveaway I'm planning for a little later in the week as it just happens to be my birthday tomorrow :-)  
Wishing everyone a great weekend!!

Thursday, October 13, 2011

Thursday tutorial links...

Plaited fabric headband
With school holidays upon us I've decided to make the most of  Pinterest and actually try some craft tutorials I've pinned . I've been down with the flu since last Thursday so it was good to actually get some crafting done and feel human again. With some guidance from me Amelia made this pretty plaited headband this afternoon. She's become quite fussy with what she likes and wanted no pink or girly flowery fabrics but as soon as I mentioned my batik fabric collection she had no trouble picking some nice blues and greens which just happen to be my favourite colour combo. This headband really doesn't take up that much fabric just 6 strips 1 inch wide each plus a hair tie cut in half for the elastic around the back. Very cool head band don't you think?

Pleated ribbon bookmark
I found this tutorial for a bookmark/journal wrap a few days ago and have since  been itching to whip one up. I started making this one for myself but as you can see it's adorning one of Caitlin's books. I quite like the idea of this type of bookmark as it doubles up as a neat way to keep a book such as a journal all together. It also occurred to me that it could actually make a cute headband as well.
See all that time I have spent on Pinterest has not been wasted!

What do you do to keep the kids happy and occupied in the holidays?

Friday, October 7, 2011

Planting for the coming season......

This is a view of our raised veggie garden from our bedroom window which I have just this last Saturday planted out. From left to right these beds contain, cherry tomatoes, silverbeet & lettuces, potatoes and red onions (waiting for seeds to germinate), carrots & spring onions then the last one has a mixture of herbs and rhubarb. Then in between each raised bed I have strawberries planted in pots and strawberry planters (40+ plants).
I really like these raised beds because they make my veggie garden look tidy and pleasant to look at plus they are easy to maintain and to rotate crops like potatoes. It gets full sun over most of the year and although I don't have enough room to plant everything I would ultimately like to grow I've realised there are certain crops that I seem to fail at growing like brassicas and some crops that seem to thrive no matter what I do.  In a couple of weeks I'll plant out more tomatoes, parsley and basil. Yum can't wait for easy summer salads!
These bluebells have just started flowering amongst the maidenhair fern... so pretty but I'd really like some pink ones which my parents have in their extensive garden.
This is Caitlin's cat who loves it when we are out in the garden. She always follows me around then plonks herself down right where I don't need her.

These flowers are from a plant called 'wedding bells' and make a beautiful display next to pathway which you can see in the previous photo.
And these beautiful flowers are peeking through from one of my neighbors gardens. I'm not sure what they are but I really like their pretty colour.
What's growing in your garden this season???

Thursday, October 6, 2011

Hand sewing.....

Hand quilting the Bliss quilt
Thankfully I have a couple of hand sewn projects on the go at the moment because that's all I feel like doing....sitting in the sun quietly stitching away and listening to the radio. I started to feel slightly under the weather yesterday which I think originated from a chest infection that Caitlin caught earlier in the week and which kept her home for 2 days. I'm hoping to feel better soon as I'm not used to feeling sick and also feeling unproductive. I finished machine quilting this quilt last week and am now up to adding some hand quilting to the pinwheel blocks. I'm using a combination of Perle cotton size 8, quilting cotton and stranded embroidery thread just to get the right colour matches. I think it's looking okay so far and it's not taking too long either so hopefully a finished quilt to reveal soon! 


170 yoyo's completed
And this is my yo-yo project, 170 yo-yo's completed so far although it's hard to tell there's is that many in this photo.

Yoyo project on the go
I'm using this picnic basket which is not too large for carrying around this project. It's great to have everything together so I can just grab it and pop it in the car at a moments notice. On Tuesday I and a sick Caitlin went up to Auckland with my husband and because I knew we would be waiting in the car for him while he attended a couple of meetings I took this project with me and got 10 yo-yo's done during one meeting/waiting time. Caitlin occupied herself by counting the competed yo-yo's for me.

Finally I just wanted to share where this cushion now lives. I sold it a few weeks ago on etsy to a lady in Texas who was expecting her second baby. Last week she sent me a link to some photos of her beautiful newly decorated nursery where my cushion sits perfectly at home on a chair. She has submitted her nursery design to a site called Project Nursery where viewers can rate each nursery design out of 5. I think hers is worth a 5 but I might be biased :-) 

Related Posts Plugin for WordPress, Blogger...