Showing posts with label Christmas. Show all posts

Tuesday, December 23, 2014

A little like Christmas....


 Our tree is up and decorated with some favourite decorations along with some handmade wreaths around the house. Our little street is looking like a disco with a few of the houses going slightly overboard with outdoor Christmas lights bringing a steady stream of cars crawling up our street.

 Somehow even though we are surrounded by festive Christmas lights and our house is suitably decorated we are somehow not feeling very festive this year. My eldest daughter Amelia commented that I hadn't done any Christmas baking like I normally do each year. So in an effort to make at least my daughters feel a little more festive, yesterday afternoon we decided to make some chocolate peppermint bark. It's an easy recipe to make just a bit of waiting time for each layer to set before adding the next. We started melting chocolate then realised we didn't have any candy canes. A quick trip to the supermarket revealed that they were all sold out so we decided to improvise and make do with what we did have and we came up with triple chocolate peppermint and pistachio bark.

 Not much of a recipe to share but here it is:
  1. Melt 200 gms white chocolate with 1/2 tsp peppermint essence and 20 gms kremelta (vegetable shortening) and spread onto base of a lined sponge roll tin. Place in freezer to set.
  2. Melt 200 gms milk chocolate with 1/2 tsp peppermint essence and 20 gms kremelta and spread onto set white chocolate layer then sprinkle with chopped pistachios. Place in freezer to set.
  3. Melt 100 gms dark chocolate with 1/4 tsp peppermint and 10 gms of kremelta and spread over second layer. Melt 100 gms white chocolate with 1/4 tsp peppermint essence and 10 gms of kremelta and place on dark chocolate then using a skewer marble the two layers together. Finally sprinkle with more chopped pistachios.

Another recipe I usually make each Christmas are these fresh ginger biscuits which I made this afternoon using a variety of Christmas themed cookie cutters. This recipe makes a lot so they are good for giving away ;-)
  • 375g softened butter
  • 1 3/4 cups brown sugar
  • 1 egg
  • 1 1/2 tbsp grated fresh ginger
  • grated rind of 2 lemons or oranges
  • 3 3/4 cups flour
  • 2 tblsp ground ginger
  • 1 tbsp cinnamon
  • 1 1/4 tsp baking powder
  • 1/2 tsp ground white pepper
  • 1/4 ground cloves
  1. Beat butter and sugar together until light and creamy. Beat in the egg, grated rind and fresh ginger.
  2. Sift together all dry ingredients and stir into creamed mixture until well combined.
  3. Roll out the dough to 0.5mm thick and cut out shapes using various cookie cutters.
  4. Bake at 180C for 10-12 mins. Cool before storing in an airtight tin.


Thursday, December 27, 2012

A surprise in the post....

 I am feeling very blessed and grateful today to have made such good, supportive and generous friends through my blog. One such friend is Karen who is an Australian blogger who today surprised me with this Christmas parcel. Included in it was an Aneela Hoey quilting journal which  is filled with blank thick artist quality paper and some graph paper at the back and I can't wait to start using it. She also included a pretty embroidered laced edged linen and a very much needed bookmark. Much needed because I currently have no less than 5 books on the go. Yes books are my therapy at the moment as are girlfriends :-) 
Thank you Karen, you are so generous and thoughful :-)

 I have also been meaning to share this parcel that I recieved a couple of weeks ago just in time for the Christmas decorating. Back sometime in the beginning of November I agreed to do a Christmas ornament swap with Julie who follows my blog and is unfortunately not a blogger herself but I think she should be as she is a very clever crafter going from what she sent me for this swap. Everything is perfectly made right from the pretty wrapping of the parcel itself.
Julie generously made me not one or two ornaments but four ornaments all beautifully and perfectly crafted. 
Thank you Julie for your generosity and I would gladly do another swap with you next year!

I hope everyone is enjoying a peaceful and joyous Christmas/New year holiday break. For the last month I have been very busy sewing things for my shop and also some last minute Christmas gifts so will back here soon to share what has kept me away from blogging these last 3 weeks.

Saturday, January 7, 2012

Gifts for ladies...

Amy Butlers Blossom bag version 2
When my Mother saw my blossom bag that I made a couple of months ago now she liked it so much she asked me to make her one for Christmas. She chose 3 lovely Denyse Schmidt prints available at Spotlight stores here, all of which I love myself and have happily got quite a bit of each one left over to use on another project.

Amy Butlers Blossom bag version 2
The second time making this bag was a wee bit smoother than the first time. I made sure that the magnetic enclosure was a little higher than on my bag which is sometimes difficult to close as it's a tad too low. Also I had to again cut nearly an inch off the ends of the base pieces so I can only put that down to the measurements being out a little in the instructions. I was so busy in the weeks leading up to Christmas that I ran out of  time to make it so she received it just over a week later. Thankfully I also gave her a knitting roll (the one with the birds on it) that was one of 3 I made to sell in my Etsy shop, so she had something to open on the day. When I made the knitting rolls she couldn't choose which one she liked so we decided that whichever one didn't sell would be hers. It turned out the bird one was the one she really wanted.

Little bird pincushion
And after making this little bird for my giveaway I decided to secretly make one each for the girls to go in their stockings. I used some leftover Bliss fabrics and the red and white dot print from Camille & Bonnie's latest collection "Ruby".  They were suitably surprised and pleased when they were unwrapped.
Now I think I need one myself! They remind of the friendly little fantails that tease our cats in our garden.
I have one more gift to show here but I keep forgetting to either take my camera or forgetting to take a photo when I do remember my camera.

Thursday, January 5, 2012

Toys for small boys....

Stacking cubes
Now that Christmas is well and truly over I can safely share some of my handmade creations with you here. First up is a set of stacking cubes from Anna Maria Horners book "Handmade Beginnings". Not the easiest of projects I've got to say but hey the result is worth the extra effort plus it's always good to challenge yourself now and then! These are for my latest great nephew born in October so he's not up to appreciating them fully yet but I'm sure he will appreciate all the colours for now. And yes saying 'great nephew' does make me feel old  but it's all my brothers fault who was quick off the mark in starting his family when I was still a teenager.

Stacking cubes
As you can see I went with an 'I Spy' theme with the fabrics I chose for these to make them even more fun and interesting to play with. 
Stacking cubes
Each cube has little ribbon tags which I made sure included some different textures to feel. 

Drawstring bag xmas gift
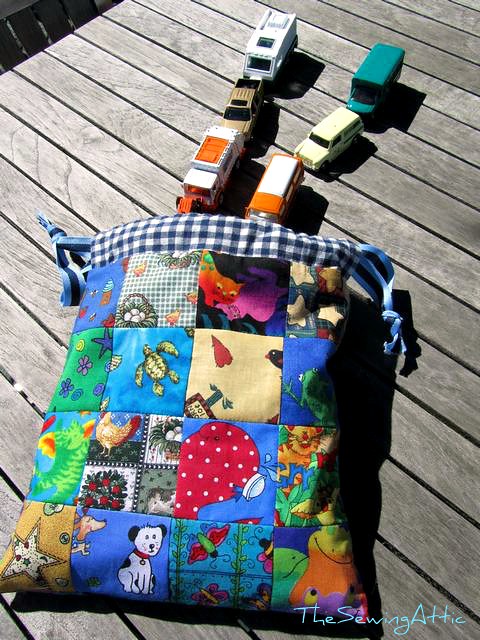
And for my eldest great nephew who is 4 years I made a patchwork drawstring bag using the same fabrics as the cubes.I used this tutorial by Ayumi from Pink Penguin to make it which had great easy to follow instructions. I filled it with little matchbox cars which as I had hoped went down well. 
More handmade gifts to be shared here soon!
This past week has flown by with the very wet weather we have been having lately keeping me busy trying to get washing dry and keeping the girls entertained since it was far from beach weather. I got a "Wasgij" jigsaw puzzle out earlier in the week and I was pleasantly surprised at how it kept the girls captivated and completely absorbed until it was completed. 


Saturday, December 31, 2011

Having a break to just be.....

 This past week I have been enjoying some unplanned time away from the computer, spending time with my two girls, playing new games received at Christmas, going on walks, sewing up a storm, eating way too much chocolate and just generally enjoying this past week without any demands on my time. It's been nice to just take a step back and enjoy what comes along each day.

Caitlin and I once again did our favourite coastal walk to take in the beautiful crimson flowers of the Pohutakawa trees which really does mean summer has arrived although as I write this it is pouring down outside for the second day in a row. 
For some reason that I have yet to figure out these trees don't all flower at the same time. It would be nice if they did but I guess it makes their flowering time that much longer which is a good thing too.

Our walk this particular day wasn't the best of experiences as it rained about halfway along, thankfully it was a quick and light shower and we were able to shelter in the bush. Then Caitlin got an allergic reaction to we think some grass seed that she rubbed into her eye which swelled up just a tad along with itchy hives on her legs. To top it off my jandal broke just as we were starting back so I had to walk barefoot the rest of the way. 


A couple of days before Christmas I took some time out from my gift making to make this handmade decoration with Caitlin out of old Christmas cards. This little heart house is a great way to re-use and preserve those lovely cards that are received over this holiday season that always seem too nice and special to just throw away. You can find the very easy tutorial over here on Michele's blog. The only thing I did differently was to stick all the hearts together (cut out from middle of the houses) and string them to the bottom of the house. The beads on the top and bottom are from a bracelet of one of the girls that broke some time ago and I had never quite gotten around to fixing it so I guess they were just waiting for that perfect project or 2 :-)
So if your  in the midst of packing up your Christmas decor save those cards to make this ornament for next year.
Now I did say at the beginning of this post I had been sewing up a storm so now that the gifts have been given and received I shall be back here soon to show what I have been busy creating these past few weeks.
Wishing everyone a safe and happy New Years eve!

Thursday, December 22, 2011

Nearly Christmas eve, eve...


Yes according to my youngest daughter its Christmas eve, eve tomorrow which I guess is a good way of making Christmas day seem like its a little bit closer. Actually I'd like an extra day to do all the things I'd like to have done but I'm sure what's left on my to do list that doesn't get completed won't really matter on the day. We spent yesterday doing a whole lot of Christmas baking for edible gifts and also to fill up the tins for the coming holiday season. Above is Christmas shortbread stars which contain red and green glace cherries and are then dipped in dark chocolate.

 We make these fresh ginger and spice biscuits each year using various Christmas themed cookie cutters. Not only are these delicious but they make a lot as in 60 + biscuits...

and then I just couldn't resist this recipe that I saw on Pinterest  and then around a couple of blogs this week. These are seriously yummy and worth my search for candy canes which my local supermarket and in the next town along were out of at the beginning of the week?!...
and finally we made these peppermint creams for my Dad which we also do each year. Here's the recipe if your in need of a last minute gift or just want something yummy to nibble on each time you visit the fridge :-)

You will need:

  • 25 grams butter
  • 1/4 sweetened condensed milk
  • 2 cups icing sugar, approximately
  • 1/2 tsp peppermint essence
  • few drops green food colouring
  • 200 grams dark chocolate
Mix all ingredients together in a food processor until it forms a firm paste. Roll into small balls then chill for several hours or overnight.Dip in melted chocolate and place on a baking tray to set. Keep chilled in fridge. I doubled this recipe and I think it made 30 to 40 small balls.

My house is now all clean and tidy after today's effort, shopping is pretty much finished so it's present wrapping tomorrow otherwise known as Christmas eve, eve. How are your preparations coming along?

Monday, December 12, 2011

Feeling Christmasy

Yes it's starting to feel that Christmas is just around the corner now. I have been madly sewing up some handmade goodness for most of my family. I have 3 gifts left to make and this morning I just added to 2 more gifts to make to the list that is in my head but should really be written down even if to make me feel good when I cross things off as they are done. 
Caitlin and I put our tree up yesterday and it certainly felt like Christmas as we opened up the boxes of decorations and fondly remembered all our favourite ones, from the vintage to the precious handmade ones. I do have plans to make more decorations but that will have to wait to next week when the gift making will hopefully be finished.

After the tree decorating was finished we went for a wee coastal walk in the hope that the New Zealand Christmas tree aka 'the Pohutakawa' was in full bloom but we were still a week or so too early. I did manage to zoom in on this early bloom though to whet your appetite.
How are your preparations going?

Oh and a giveaway is coming soon!

Wednesday, December 29, 2010

Handmade with love.......

This was the scene in our house on Christmas morning, the girls beginning to open their presents from us before breakfast.....although I can't quite remember breakfast actually happening. I think the girls were too excited to be hungry and perhaps too busy eating chocolate. I know that makes us sound like bad parents but hey its only for one day of the year and that's part of Christmas to me, having treats at odd times of the day.
Now lets have a little handmade gift show'n'tell.....
I made this pen roll for Caitlin as she kept stealing her sisters one and she LOVES to draw.
All rolled up and ready to travel with her.
This little threesome of gifts was for my Mum. She came shopping with Amelia and I a couple of weeks before Christmas and I got her to pick out some fabrics but I didn't tell her what they were for. I made her a lavender filled teapot stand (lavender from her garden and pattern from the spring issue of Stitch) a pot holder ( tutorial here) and a folding market tote made from a Heather Bailey pattern.
Here's the reverse side of the potholder and teapot stand.
And here's the market tote all folded out. This pattern was very easy to follow like all Heather's patterns seem to be and I will be definitely making more of these.
And this is a very large memo board I made Amelia for her new room that I'm currently redecorating for her. I manged to get Amelia to pick out some favourite fabrics without her knowing what they were for. I must say she has great taste as they were all Heather Bailey's. The print I ended up using is from her pop garden range and I think this project makes the most of this large scale print. The base is a large artists canvas (thanks for the tip Lara!) to which I added some cork board so things can be pinned onto it as well as tucked behind the ribbon. The board is 24" x 36", took about 4 metres of ribbon, 28 buttons and just a few hours to put together. I am so impressed with how well this turned out. I think I need one for my sewing attic! Oh and on a sad note my machine is broken as in "not repairable" broken!!! Luckily I had  finished my Christmas sewing when it happened, just, and my Mother has lent me hers in the meantime. It would be a great excuse to buy a new one with all the bells and whistles if only I could afford it but unfortunately it couldn't have happened at  a worse time for us.
 The girls and I have had a lot of fun playing this game too lately. I had always wanted it as a kid so I'm making up for lost time now. I think the girls played about 5 games in one day on Monday.
Do you have a favourite family board game??


Tuesday, December 28, 2010

A Christmas recap........

So I didn't mean to not blog for over a week but last minute Christmas preparations took up all my time. I have been busy making these ginger spice Christmas biscuits with the help of my assistant Caitlin who loves to choose all the Christmas themed shapes and help roll and cut out. We also made A LOT of  chocolate truffles to giveaway as gifts. The girls helped me roll them into balls, dip them into white and dark chocolate them drizzle and decorate some in milk chocolate. I'm not sure how many I made but I did make 5 different sorts, orange liqueur, ginger, coffee, white chocolate/coconut and peppermint creams. Is your mouth watering yet? No photo's sorry. It took me two days to finish them so I was a little over truffles by the end.

On the Wednesday before Christmas we did our annual drive around town to look at the Christmas lights. The above home really goes all out with their whole garden covered in lights. These photos don't do it full justice but you get the idea.

I think it takes them about a week to complete it all.

A life sized nativity scene is part of it.

This is one of the houses in out street where nearly everyone has lights decorating their homes and gardens.

Our neighbors house.

And out Christmas tree all lit up. And of course I was super busy making some handmade presents which I shall share with you tomorrow.
Happy holidays to everyone!!! 

Thursday, December 16, 2010

Handmade Christmas - a fabric wreath

We had a rather cool and very wet day today as you can see from the rain on the windows in these photos. As they say "good for the garden" and I say good for some creativity in my sewing attic!
Everything I used to make this wreath is what I had on hand. I love it when I can make something entirely from my stash! Leftover scraps of  batting wrapped around the cane base, then leftover ends of bias binding were used to cover the batting. A couple of yoyos and a fabric flower leftover from previous projects.

The big red flower is one created by my clever Mother and was the perfect match for the colours on the wreath base. I have quite a few of these lovely knitted flowers just waiting for the right project to be matched with. Thanks Mum!

I added more yoyo's made from scraps and finished with various buttons from my button stash. The little Christmas tree is a ceramic button that I got a few years ago and thought I would never use. And for a little sparkle I added a few beads when I sewed on the buttons
So there you go another inexpensive and easy Christmas decoration and something bright and cheery to lift a dull rainy day.

Wednesday, December 15, 2010

A handmade Christmas - the button wreath

Here's another quick and simple decoration idea and inexpensive too if you are like me and collect buttons old and new.
All you need is some wire strong enough to take the weight of the buttons but bendable so you can make a nice round shape, a selection of buttons of varying sizes, ribbon , and a few bells for a nice Christmasy jingle.
  1. Simply cut your wire to desired length (which will depend on how big you want your wreath and how many buttons you have)
  2. Thread on your buttons then twist wire ends together to secure.
  3. Add a ribbon loop for hanging and tie ends in a bow.
  4. Thread bells onto ribbon and tie with a bow onto wreath letting them hang in the middle.
That's it! A simple button wreath. If you feel inspired to make one I'd love to know.

Tuesday, December 14, 2010

Handmade Christmas decoration No.2

 
Today's Christmas decoration is another very easy and inexpensive one for the tree.
I used 4 circles the same size as yesterdays decorations, folded each one in half then glued them together (wrong sides facing) alternating the 2 colours. Add a hanging loop to the top then attach a length of embroidery floss the the other end. Thread on some beads, then another smaller paper globe and finish with a few more beads. Easy peasy!
To keep the beads from slipping down just backstitch through the last bead. These look great hanging on the bottom branches of my tree, I just hope our cats don't mistake them for new toys!


Monday, December 13, 2010

Tis the season to decorate.........

Another weekend has flown by and I still have not made a start on my list of handmade presents. This weekend I was distracted by the beautiful hot weather we are still experiencing and spent quite a bit of time in my garden, spraying the lawn for unwanted weeds, trimming the rosemary bushes with the company of our 2 cats who must have been enjoying the scent of the rosemary leaves like I was. I have also finished preparing the walls in Amelia's soon to be new room ready for re-wallpapering and now need to sand back the window frames ready for a fresh coat of paint. Re-decorating a room is a fun project, it's just the preparation work that is a little tedious.

Caitlin and I had a fun day yesterday decorating the Christmas tree. Each year I buy a few new decorations and also like to make some handmade ones as well. Since it's been over a week since I last posted I thought I would make up for my absence here by posting each day over the next few days with a new handmade decoration to share with you all.

These paper globes may already be familiar to some of you as I have seen them on a few blogs myself lately. They look quite intricate and difficult to make but are really quite easy to do especially when you have a little helper like I did. I made mine from Christmas themed scrapbook paper but you could use any paper. There is a great tutorial here that I based mine on.

This one was made using double sided scrapbook paper.

I applied glitter to the edges for a little Christmas sparkle. If you want to do this attach the hanging thread first unless you want glitter all over your hands like I did.

Okay I'm off to cook a quick dinner before we head out to Caitlin's School for the break-up/prize giving night but I'll be back tomorrow with another easy handmade decoration to inspire you.
Related Posts Plugin for WordPress, Blogger...