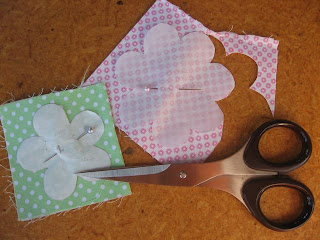
This is a hopefully simple tutorial on how I make my fabric flowers. I do quite a few variations but we'll start with a basic one.
You will need :
- Small fabric scraps for 2 flower shapes
- Paper for making flower pattern
- Steam-a-seam or similar product
- Small scrap of felt
- Small fabric scrap for yo-yo
- Coordinating thread
- Needle and small scissors
- Button
Draw and cut out to paper patterns of 2 different sized flowers. Fuse your fabrics together ( 2 layers of the same fabric wrong sides together) using the steam-a-seam. Pin pattern onto fused fabric and cut out.
Thread your needle with coordinating thread and tie knot at one end. Starting at the centre of the flower push your needle in between the 2 layers to 1/8 of an inch from the outside of the flower.
Using a running stitch sew all round the edge pulling the thread and shaping the petals with your thumb and finger as you go. When you've sewn all the way around push the needle back between the two fabrics and secure the thread ends together.Once all the layers are sewn together you will not see these thread ends. Repeat these steps with remaining flower.
Cut out a small circle of felt. Make small wedge shaped cuts all around the edge by folding in half and cutting tiny triangles at each end of fold. Continue folding and cutting until there are even wedges cut out all the way around ( about 8 wedges).
For the yo-yo cut a small circle of fabric. I used a cardboard pattern from a covered button making kit.
Sew a running stitch all the way around folding a scant 1/8 inch as you go. The bigger you stitches, the smaller you centre will be.
Pull thread to gather up into a little pouch shape, flatten out into yo-yo and secure your thread ends.
You should now have four layers to make up your flower. Place together from biggest to smallest ending with the yo-yo. I secure the layers together making sure they are centred then sew the button on top sewing through all layers. Congratulations you now have one flower to use to embellish a bag or make into a brooch and pin to a plain top. You can make this flower your own by adding beads or use felt for one of the flower shaped layers. I also like to sometimes use a covered button for the centre. Play around with different flower shapes too. You can see some of my flowers here.
I had intended to show what I have been making with all these flowers but it was an over cast day and my photos weren't quite up to scratch.


4 comments:
Thanks for the tute Catherine, they are lovely! As I well know of course as I happen to be the proud owner of one of them!
What is more, when I went to the V&A last sunday, I was wearing a white shirt and black pinstriped jacket with on the lapel? Exactly, your lovely red and blue fabric flower! It has seen the Quilt exhibition and widely (covertly, lots of pointing and whispering of strangers) admired!!
these are very cute
These are lovely, and I am now trying to think how I will be able to refer back to these when I want them. I assume this will stay on your site (maybe) forever. Thanks for sharing.
hi catherine thanks for doing the tutorial I can't wait to make myself one to wear.
hope you and your family are well?
love and hugs georgie xx
Post a Comment